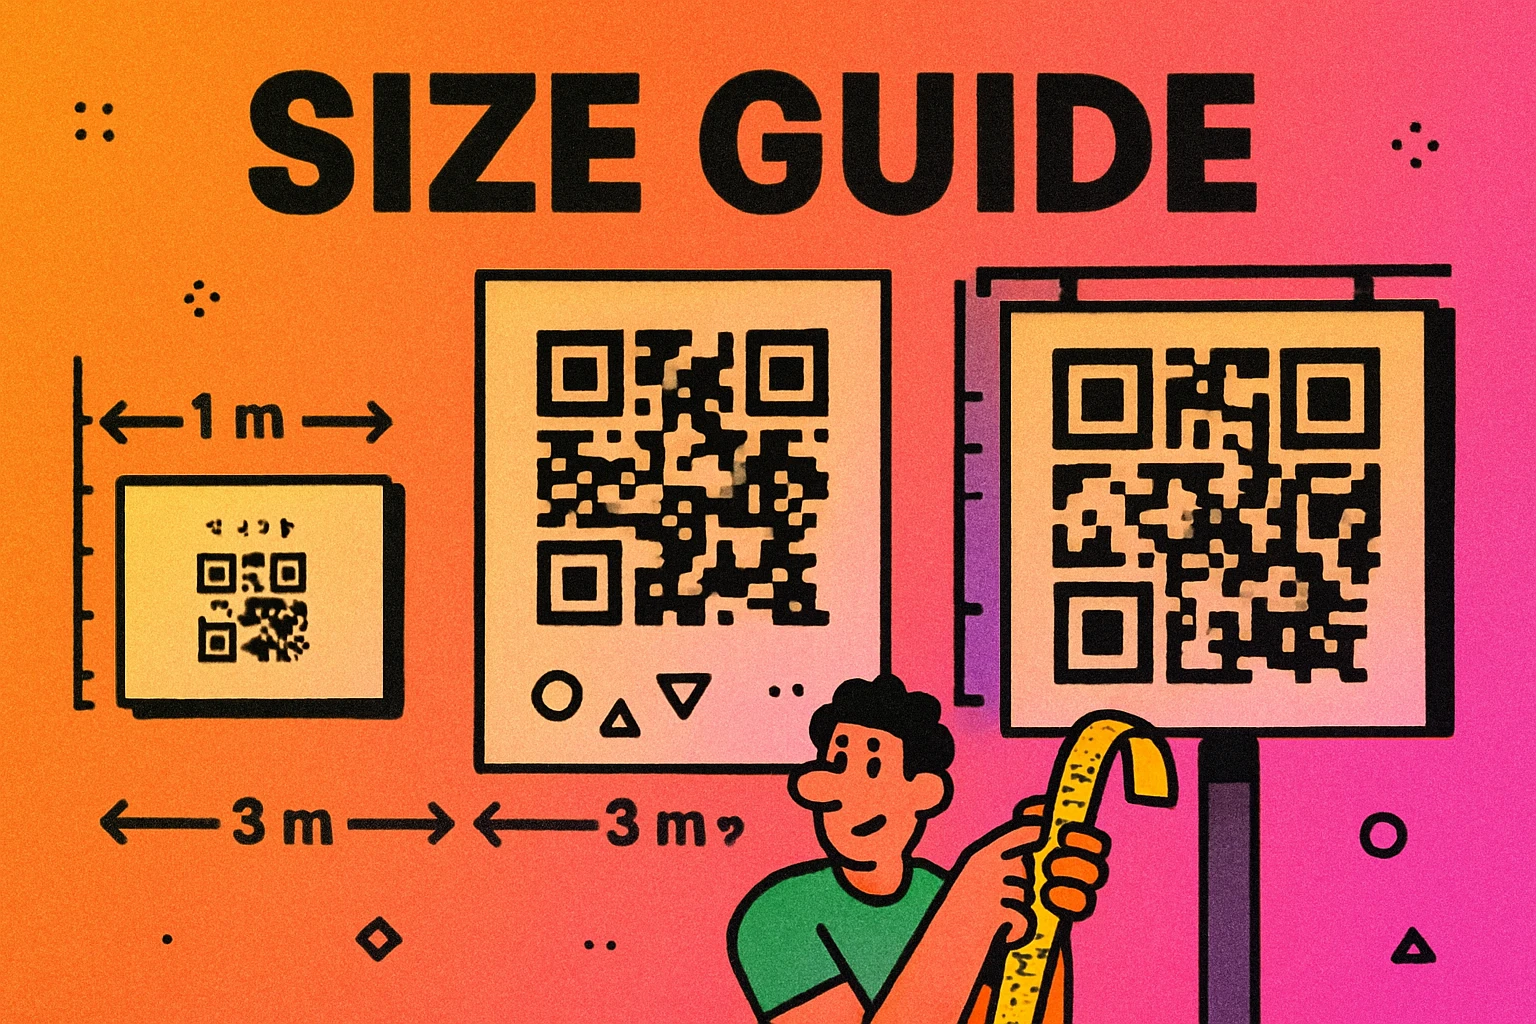
The 10:1 Rule: One Formula to Remember
If you take away one thing from this QR code size guide, let it be this: divide the expected scanning distance by 10 to get the minimum QR code width. This is called the 10:1 rule, and it covers the vast majority of real-world sizing decisions.
The formula is simple:
Minimum QR code width = Scanning distance ÷ 10
For example, if you expect users to scan from about 30 cm away (a hand-held flyer), the code should be at least 3 cm wide. If the code will be on a poster viewed from 2 meters away, it needs to be at least 20 cm wide. If it’s on a billboard scanned from 20 meters, think 2 meters.
This rule accounts for the average smartphone camera’s focal length and resolution. Higher-end phones with better cameras may scan from slightly farther, but designing to the 10:1 rule ensures compatibility with the widest range of devices.
The 10:1 rule is a minimum, not an optimum. When space allows, go bigger. A code that’s slightly too large is invisible as a problem. A code that’s slightly too small gets reported as “broken” by frustrated users.
Keep in mind that the 10:1 ratio assumes a simple QR code — one with a short URL and standard density. If your code encodes a lot of data (a long URL, vCard, or block of text), you’ll need to go larger. We’ll cover why in the data density section below.
Minimum Sizes for Common Use Cases
Here are the recommended minimum QR code dimensions for the most common print and physical applications. These assume a standard-density code (short URL, error correction level M).
| Use Case | Min. Size | Scan Distance | Notes |
|---|---|---|---|
| Business card | 2 cm × 2 cm | 15–25 cm | Absolute minimum. Use a short URL. |
| Product label | 2.5 cm × 2.5 cm | 20–30 cm | Account for curved surfaces. |
| Flyer / brochure | 3 cm × 3 cm | 25–40 cm | Comfortable hand-held scanning. |
| Magazine ad | 3.5 cm × 3.5 cm | 30–50 cm | Readers scan from desk or lap. |
| A4 / Letter poster | 5 cm × 5 cm | 50 cm–1 m | Typical office or hallway display. |
| A3 poster | 8 cm × 8 cm | 0.5–1.5 m | Store windows, event signage. |
| Large poster / banner | 10+ cm × 10+ cm | 1–2 m | Trade shows, indoor banners. |
| Billboard / outdoor | 30+ cm × 30+ cm | 3–5 m | Pedestrians. Cars are too fast to scan. |
A quick note on billboards: QR codes on highway billboards are almost always a bad idea. Drivers can’t safely stop to scan, and the scanning distance from a moving car at speed is impractical. QR codes on outdoor signage work best where people are standing still or walking slowly — bus stops, pedestrian areas, building facades, and outdoor menus.
For a deeper look at QR code fundamentals, see our complete guide to QR codes.
Size vs Data Density: Why More Data Means a Bigger Code
A QR code’s visual complexity is directly tied to the amount of data it encodes. Every QR code is made up of a grid of small squares called modules. The more data you encode, the more modules the code needs, and the denser the grid becomes.

Here’s why this matters for sizing:
- A 20-character URL produces a Version 2 code (25×25 modules). Each module is relatively large, making the code easy to scan even at small print sizes.
- A 100-character URL produces roughly a Version 7 code (45×45 modules). Each individual module is now much smaller at the same printed size, so the code needs to be physically bigger to remain scannable.
- A full vCard (name, phone, email, address) can push the code to Version 15+ (77×77 modules or more). At 2 cm printed size, each module would be just 0.26 mm — far too small for most cameras to resolve.
The practical takeaway: keep your encoded data as short as possible. Use short URLs, dynamic QR codes (which encode a short redirect URL instead of the full destination), or URL shorteners. The shorter the data, the simpler the code, and the smaller you can print it reliably.
Higher error correction levels also increase module count. Level H (30% recovery) produces a denser code than Level L (7% recovery) for the same data. If size is constrained, use Level M as a practical compromise.
Print Resolution: DPI, Vector, and Raster
Getting the physical size right is only half the equation. The other half is resolution — making sure each module has crisp, well-defined edges when printed.
The 300 DPI Rule
For standard print (business cards, flyers, brochures, magazines), export your QR code at a minimum of 300 DPI (dots per inch) at the final printed size. This ensures each module has sharp edges that scanners can distinguish cleanly.
At 150 DPI, small QR codes start to look soft. Below 150 DPI, individual modules blur into each other, and scanning reliability drops significantly.
Vector vs Raster
The safest approach for print is to export your QR code as an SVG (Scalable Vector Graphics). SVG files are resolution-independent — they scale to any size without losing sharpness because they describe the code mathematically rather than as pixels. Whether you print at 2 cm or 2 meters, an SVG remains perfectly crisp.
If SVG isn’t an option and you must use a raster format (PNG, JPEG, TIFF), calculate the required pixel dimensions like this:
Pixels = Print width (in inches) × DPI
A 3 cm (1.18 inch) QR code at 300 DPI needs to be at least 354 × 354 pixels. A 10 cm (3.94 inch) code needs 1,182 × 1,182 pixels. Always export larger than you think you need — you can scale down without losing quality, but scaling up destroys sharpness.
For an in-depth comparison of output formats, see our article on QR code file formats.
Never export a QR code as JPEG for print. JPEG compression introduces artifacts around the sharp edges of modules, which reduces scannability. Use PNG (lossless) for raster or SVG for vector. Generate-QR.Codes offers free SVG and high-res PNG export.
Large-Format Printing
For large-format outputs (posters, banners, billboards), 150 DPI is acceptable because the viewer is standing farther away. At 2+ meters viewing distance, the human eye (and the phone camera) can’t distinguish 150 DPI from 300 DPI. The key requirement at large format is that each module has a hard, clean edge — which SVG guarantees regardless of scale.
Generate Print-Ready QR Codes
Free SVG and high-resolution PNG export. Correct size, every time.
Digital Sizing: Screens, Email, and Social Media
QR codes on screens follow different rules than print. The 10:1 scanning distance rule still applies, but you also need to account for screen size, pixel density, and the context in which the code appears.

QR Codes on Websites
On a desktop website, a QR code is typically scanned by pointing a phone at the computer screen from about 30–50 cm. A display size of 200×200 pixels minimum works for most cases. At 300×300 pixels, scanning is fast and reliable across devices.
QR Codes in Email
Email is tricky because many clients (Outlook, Gmail) resize images. Export your QR code as a PNG at at least 300×300 pixels, and set explicit width and height in the HTML so the image isn’t collapsed. Avoid using a QR code as the sole call to action in email — many recipients open email on the same phone they’d use to scan, making scanning impossible. Always include a clickable text link alongside the code.
QR Codes on Social Media
Social platforms compress images aggressively. Upload QR codes at at least 500×500 pixels to survive compression with enough clarity to scan. Instagram, in particular, applies heavy JPEG compression. Test the posted image by scanning it from another device before relying on it.
QR Codes on TV and Digital Signage
For screens viewed from 1–3 meters (TVs, conference screens, digital signage), the code should fill at least 15–20% of the screen width. On a 55-inch display, that means roughly 20–25 cm of on-screen width. Give viewers at least 8–10 seconds to pull out their phone and scan. A code that flashes on screen for 3 seconds is useless.
The Quiet Zone: Don’t Skip the White Border
The quiet zone is the blank margin surrounding a QR code on all four sides. It’s not decorative — it’s functional. The scanner uses this empty space to detect where the QR code begins and where the surrounding design ends.
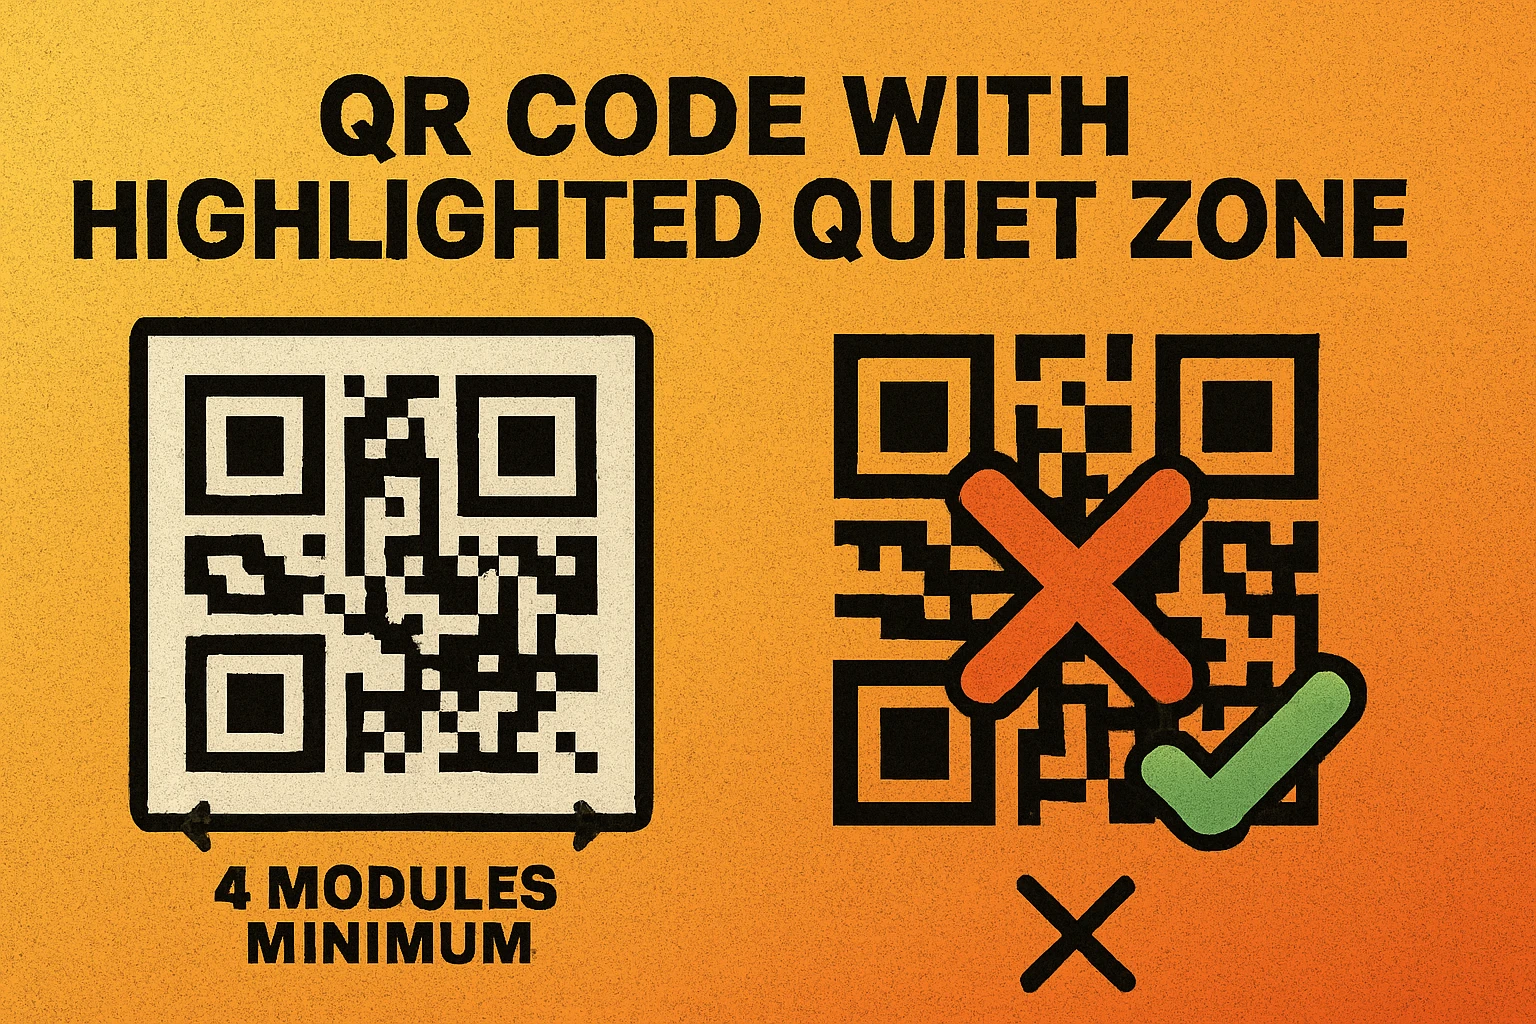
The QR code specification (ISO/IEC 18004) requires a minimum quiet zone of 4 modules on all sides. One module is the smallest square unit in the code’s grid. If your code is Version 2 (25×25 modules) and printed at 2.5 cm, each module is 1 mm, so the quiet zone must be at least 4 mm on each side.
In practice, this means your QR code’s total footprint (code + quiet zone) is larger than the code itself:
| Code Size | Quiet Zone (4 modules) | Total Footprint |
|---|---|---|
| 2 cm × 2 cm | ~3 mm per side | ~2.6 cm × 2.6 cm |
| 3 cm × 3 cm | ~4 mm per side | ~3.8 cm × 3.8 cm |
| 5 cm × 5 cm | ~6 mm per side | ~6.2 cm × 6.2 cm |
| 10 cm × 10 cm | ~12 mm per side | ~12.4 cm × 12.4 cm |
When planning layouts, budget for the full footprint, not just the code. Designers frequently crop the quiet zone to save space, which leads directly to scanning failures. If a graphic element, text, or colored border bleeds into the quiet zone, treat it as a broken code.
Most QR code generators (including ours) automatically include the quiet zone in the exported image. If you’re cropping the image or placing it on a colored background, make sure you’re not eliminating this critical margin.
Testing Before Printing: A Pre-Print Checklist
Getting the size and resolution right on paper (or in a calculator) is necessary but not sufficient. You should always test the actual output before committing to a full print run. A single test sheet can save thousands of wasted prints.
- Print a proof at final size. Export the QR code at the exact dimensions it will appear in the final piece. Print it on the same type of paper or material. Screen scanning and print scanning behave differently.
- Scan with at least two phones. Test with one iPhone and one Android device. Use the default camera app, not a third-party scanner. If it works on both, you have broad compatibility.
- Scan at the expected distance. If the code will be on a poster, stand as far from the test print as a real user would. Don’t just scan from 15 cm and call it good.
- Test in real lighting conditions. A code that scans perfectly under your office fluorescents may struggle in dim restaurant lighting or direct sunlight with glare. If possible, test in the actual environment.
- Verify the destination loads. Scan the code, tap the link, and confirm the page loads correctly on mobile. A perfectly scannable code that leads to a 404 page is still a failure.
- Check the quiet zone visually. Confirm that no design element touches or overlaps the code’s blank margin. Even a thin decorative border that enters the quiet zone can cause problems.
For a deeper dive into why codes fail after printing, read our guide on QR code not scanning: 12 common fixes.
Business card: 2 cm min, 300 DPI, SVG preferred.
Flyer: 3 cm min, 300 DPI.
Poster: 10 cm+ min, 150–300 DPI.
Billboard: 30 cm+ min, 150 DPI, SVG essential.
Screen: 200px+ for desktop, 300px+ for email, 500px+ for social.
Quiet zone: 4 modules on every side, always.
Frequently Asked Questions
The absolute minimum for close-range scanning (15–25 cm) is 2 cm × 2 cm (0.8 in × 0.8 in). However, the ideal size depends on scanning distance. Use the 10:1 rule: divide the expected scanning distance by 10 to get the minimum QR code width. A code scanned from 1 meter away should be at least 10 cm wide.
The more data encoded in a QR code, the more modules (tiny squares) it contains, and the denser the pattern becomes. A denser code needs to be printed larger so each module remains big enough for a camera to resolve. Use short URLs or dynamic QR codes to keep the data — and required size — minimal.
For standard print (business cards, flyers, brochures), export at a minimum of 300 DPI at the final printed size. For large-format printing (posters, banners), 150 DPI is acceptable because viewers are farther away. The best approach is to export as SVG, which scales to any size without losing sharpness.
The quiet zone is the blank margin surrounding a QR code. The specification requires a minimum of 4 modules of empty space on all four sides. Without this margin, scanners cannot reliably detect where the code begins and ends. Never let design elements, text, or borders encroach on the quiet zone.