Why Placement Matters as Much as Design
You can create a perfectly designed QR code — correct size, high contrast, strong error correction — and still see zero scans if the placement is wrong. Poor placement means wrong height, bad lighting, a warped surface, or a position that requires users to contort themselves to aim their camera. Any one of these is enough to kill engagement.
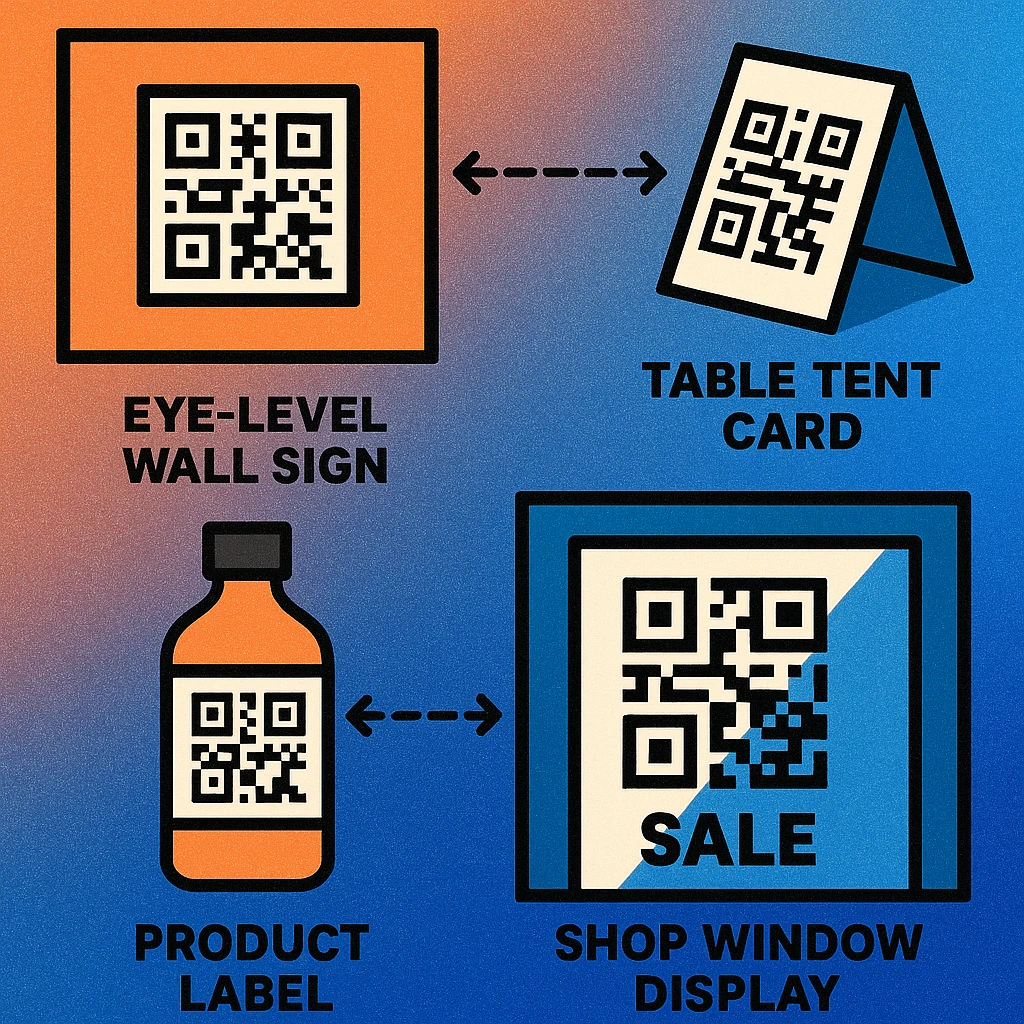
Physical placement is the last mile of QR code marketing. Before you finalise your print or installation, run through the rules in this guide. They apply whether you're placing a QR code on a restaurant menu, a window sticker, a trade show display, or a roadside billboard. For a broader view of how placement fits into a full campaign strategy, read our pillar guide on QR code marketing strategy.
A QR code must be reachable, readable, and recognisable. Reachable means within arm's length or camera aim. Readable means good light and high contrast. Recognisable means the viewer knows it's there and knows to scan it.
Eye Level and Height Placement
The single most common placement mistake is mounting a QR code too high or too low. A code above head height forces the user to tilt their phone at an extreme angle, shrinking the effective scan area. A code near the floor requires crouching — and almost nobody will.
The Ideal Height Range
For wall-mounted or freestanding displays, place the QR code so its centre sits between 100 cm and 160 cm from the floor. This range covers comfortable phone-holding height for most adults. The sweet spot is 120–140 cm — mid-chest to eye level. If you are designing for a mixed audience including children, aim for the lower end of this range (100–120 cm).
For large-format displays where the viewer stands further back, the height constraint relaxes slightly because the code is bigger and the camera angle is less extreme. However, even on a 2-metre-tall banner, keep the QR code within the lower two-thirds of the panel so it stays physically reachable for the scan.
Angle and Orientation
QR codes are most reliably scanned when the camera faces them squarely — within about 30 degrees of perpendicular. For codes on angled surfaces (slanted menu holders, A-frame signs, angled display panels), verify that the most likely standing position still gives a near-perpendicular view. Codes on surfaces angled more than 45 degrees away from the viewer's line of sight will often fail on first attempt.
Lighting Requirements
Smartphone cameras automatically compensate for lighting, but they have limits. Both extremes — direct glare and deep shadow — degrade scan performance. Good placement anticipates the lighting environment at the time of use.
Minimum Ambient Light
For reliable scanning, the QR code surface needs at least 100–200 lux of ambient illumination — roughly the level of a well-lit corridor or office. Below 50 lux (dim room, poorly-lit stairwell), camera sensors increase ISO gain, introducing noise that confuses the decoder. If a code is in a low-light location, add directional lighting aimed at the surface, or use a backlit display medium.
Avoiding Glare
Direct light — a spotlight, direct sunlight through a window, or a flash reflection — creates specular highlights on glossy surfaces that bleach out the dark modules. The fix is to use a matte finish on any QR code printed near windows or under directional lighting. Matte laminate scatters light diffusely rather than creating a mirror-like hotspot. For permanent outdoor installations, consider anti-glare materials and avoid south-facing walls that receive direct midday sun.
Always test your placement at the time of day and lighting conditions when most users will encounter it. A code that scans perfectly at noon may be unreadable by a glare-angled afternoon sun, or vice versa.
Flat vs. Curved Surfaces
QR codes are designed to be read flat. The decoder corrects for small perspective distortions using the three finder patterns in the corners, but surface curvature introduces a different kind of distortion that the algorithm cannot fully compensate for.
On a flat surface — a wall, a poster, a window, a flat-panel display — placement is straightforward. On mildly curved surfaces (a large pillar, a wide cylinder), the code can work if it is small enough that the visible portion lies on a near-flat arc. As a rule of thumb, the QR code should subtend no more than 60 degrees of arc on the curved surface. Beyond that, the corner finder patterns are at sufficiently different angles to the camera that scan reliability drops sharply.
For highly curved objects (narrow bottles, tubes, rounded corners of packaging), either move the QR code to the flattest available panel or use a compact, high-density code with error correction level H, which tolerates up to 30% reconstruction. See our companion article on QR codes in print advertising for material and print-surface considerations.
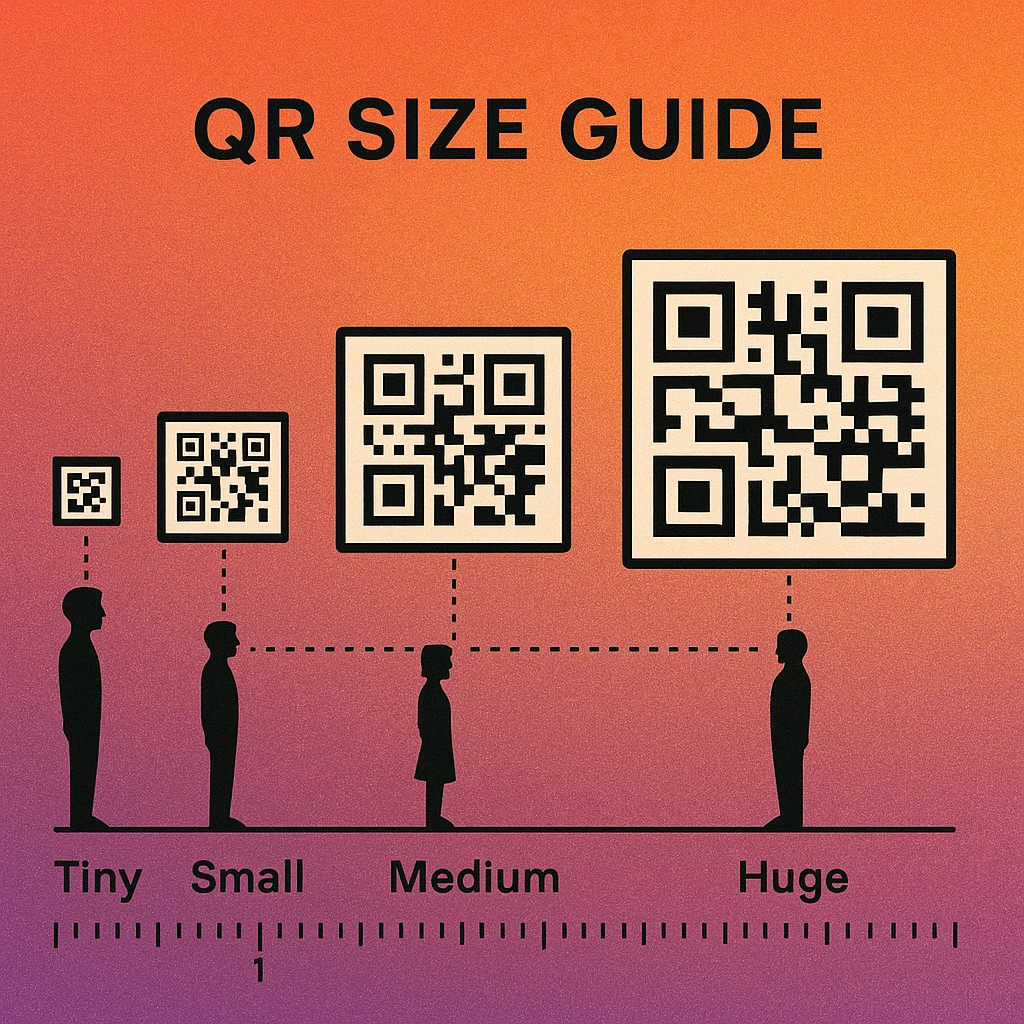
Minimum Size by Scanning Distance
The relationship between QR code size and scanning distance is linear: double the distance, double the size. The baseline is set by the camera's ability to resolve the individual modules (the small squares that carry the data). Below a certain pixel count per module, the decoder cannot distinguish modules reliably.
| Scanning Distance | Typical Context | Minimum Size | Recommended Size |
|---|---|---|---|
| 30–40 cm | Business cards, flyers (held in hand) | 2.5 × 2.5 cm | 3 × 3 cm |
| 50–80 cm | Table tent, product packaging, brochure | 4 × 4 cm | 5 × 5 cm |
| 1 m | Counter display, A5 poster, leaflet stand | 6 × 6 cm | 8 × 8 cm |
| 1.5–2 m | A3–A2 wall poster, window sticker | 10 × 10 cm | 12 × 12 cm |
| 3–5 m | Roller banner, exhibition panel, large signage | 20 × 20 cm | 25 × 25 cm |
| 5–10 m | Building fascia, bus shelter, large format banner | 50 × 50 cm | 70 × 70 cm |
| 10+ m (billboard) | Roadside billboard, building wrap | 1.5 × 1.5 m | 2 × 2 m |
For a complete deep-dive on size calculations, including DPI requirements for print production, see our dedicated QR code size guide.
QR codes on billboards are controversial for good reason: most viewers are in moving vehicles, making scanning physically impossible. If you use QR codes on roadside signage, place them only where pedestrians or stationary traffic (bus stops, queue areas) will see them. A code nobody can safely scan is wasted space.
Placement Do's and Don'ts
Ready to Print Your QR Code?
Generate a print-ready QR code at the exact size you need. Download PNG at 300 DPI or scalable SVG — free, no account needed.
Placement Do's
Place at eye level. Centre the code between 120 and 140 cm from the floor for wall and freestanding displays. This is where people naturally hold their phones when pointing a camera.
Use a matte finish. Matte laminate eliminates specular glare on printed codes. On digital signage, disable screen protectors with anti-reflective coating failures or use diffuse backlighting.
Provide clear margins. Keep at least 1 cm of clear white space around the quiet zone on all four sides. In cluttered environments, increase this to 2 cm to help the camera isolate the code from surrounding content.
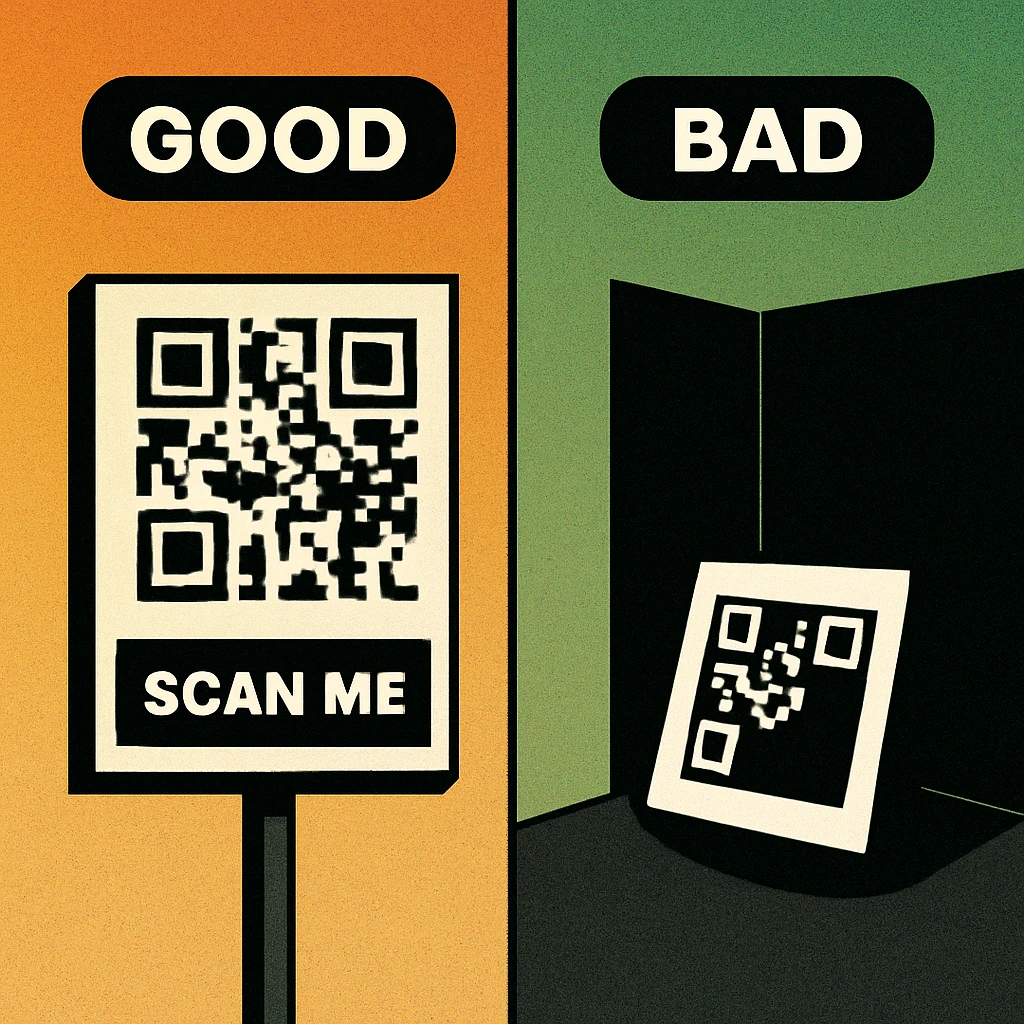
Label the code with a CTA. Always include a short call to action — "Scan to see the menu", "Scan for exclusive offer" — above or below the code. Without context, many users don't know what they'll get and won't bother scanning.
Test on-site before launch. Print a physical proof and test it at the actual location, in the actual lighting, from the actual user distance. Studio testing is not a substitute for real-world conditions.
Placement Don'ts
Don't place codes where users can't stop. Moving escalators, fast-moving walkways, and drive-through lanes do not give users time to aim and scan. Place codes only where users can pause comfortably for 3–5 seconds.
Don't print on highly textured surfaces. Rough stone, embossed paper, corrugated cardboard, and woven fabric all degrade print resolution and introduce shadow patterns that interfere with module contrast. Use a smooth substrate wherever possible.
Don't place codes behind glass without testing. Reflective glass creates double-image artifacts and unpredictable glare. If the code must be behind glass (a window sticker, a display case), test from multiple angles and times of day and use anti-glare film.
Don't fold or crease through the code. Any fold, crease, or perforation that passes through the QR code data area will corrupt modules. If a flyer must fold, position the QR code on one flat panel away from the fold line, with at least 5 mm of clear space from the nearest crease.
Surface Materials and QR Code Compatibility
The substrate you print on affects contrast, resolution, and durability — all of which influence scan reliability. Different materials suit different placement contexts.
- Coated paper (silk/gloss): Excellent ink hold and resolution. Risk of glare under directional lighting. Use matte laminate for wall-mounted applications.
- Uncoated paper: Ink absorbs into fibres, slightly reducing edge sharpness. Fine for short-print-run flyers and handouts where durability is not a concern.
- Vinyl (self-adhesive): Durable, weather-resistant, and widely used for window and outdoor stickers. Gloss vinyl is prone to glare — specify matte white vinyl for QR code applications.
- Aluminium / metal: Used for durable signage. UV-printed or engraved QR codes on brushed aluminium work well in outdoor and industrial contexts. Avoid polished mirror finishes.
- Fabric / canvas: Resolution is limited by weave texture. Use only for large-format codes (minimum 20 cm at close range) and high error correction. Tensioned fabric banners with tight weave perform best.
- Packaging cardboard: Brown kraft cardboard has poor contrast with black ink. Use a white panel or white patch for the QR code area. Recycled board with visible fibre flecks degrades module edges — test before full run.
For a comprehensive look at how these material choices interact with print advertising campaigns, see our guide to QR codes in print advertising.
Good placement means eye-level height (120–140 cm), diffuse lighting above 100 lux, a flat matte surface, a quiet zone of at least 4 modules, and a size matched to the scanning distance. Get these five variables right and your scan rate will reflect your actual audience — not your placement mistakes.
Frequently Asked Questions
At arm's length (roughly 30–40 cm), a QR code should be at least 2.5 cm × 2.5 cm (about 1 inch square). The commonly cited minimum of 2 cm × 2 cm applies in ideal lighting and contrast conditions. For printed materials like flyers or business cards where the reader holds the item in hand, 2.5 cm is the safe working minimum. Going smaller increases the risk of scan failure on lower-resolution cameras.
Place QR codes between 100 cm and 160 cm from the floor — this covers most adults' comfortable phone-holding height. The sweet spot is around 120–140 cm, which corresponds to mid-chest to eye level for most people. Codes placed below 80 cm require awkward crouching; those above 170 cm are difficult to aim at. On large format displays, centre the QR code within the lower third of the panel so it stays within reach without requiring the viewer to step back further than necessary.
Yes, but with care. Slight curvature (like a large cylindrical bottle) is tolerable if the QR code is small enough relative to the curve — the visible distortion should be less than 15–20 degrees. On highly curved surfaces, shrink the QR code so a larger portion of it lies on a near-flat section. Avoid placing codes on convex surfaces where the outer edges bow sharply away from the camera. For very tight curves (narrow bottles, tubes), use a compact QR code with high error-correction level H and test scanning from multiple angles.
Yes, lighting has a significant effect. Direct glare — sunlight or a spotlight shining straight onto a glossy surface — washes out contrast and makes the code unreadable. Low ambient light (below roughly 50 lux) forces camera sensors to increase ISO, which adds grain that confuses scanners. The ideal is diffuse, even lighting of at least 100–200 lux with no direct reflection. Use matte finishes rather than glossy laminates on any QR code that will be placed near windows or under directional lights. For permanent installations, test at multiple times of day to account for changing natural light.