Why Print Differs from Screen
A QR code that looks sharp on a MacBook display can turn into a scanning failure the moment it hits paper. Screen pixels and print dots are fundamentally different media: screens emit light at 72–96 PPI and display in the RGB colour space, while commercial printers lay down ink at 300–600 DPI in the CMYK colour space. That gap creates two of the most common print QR code problems — a blurry raster image and colour-shifted modules that lose contrast when reproduced in ink.
This guide walks through the complete Mac print production workflow for QR codes, from the moment you generate your code in the Mac QR code app to the final press-ready file you send to your printer. Whether you're producing a run of business cards or a retail display banner, the principles are the same.
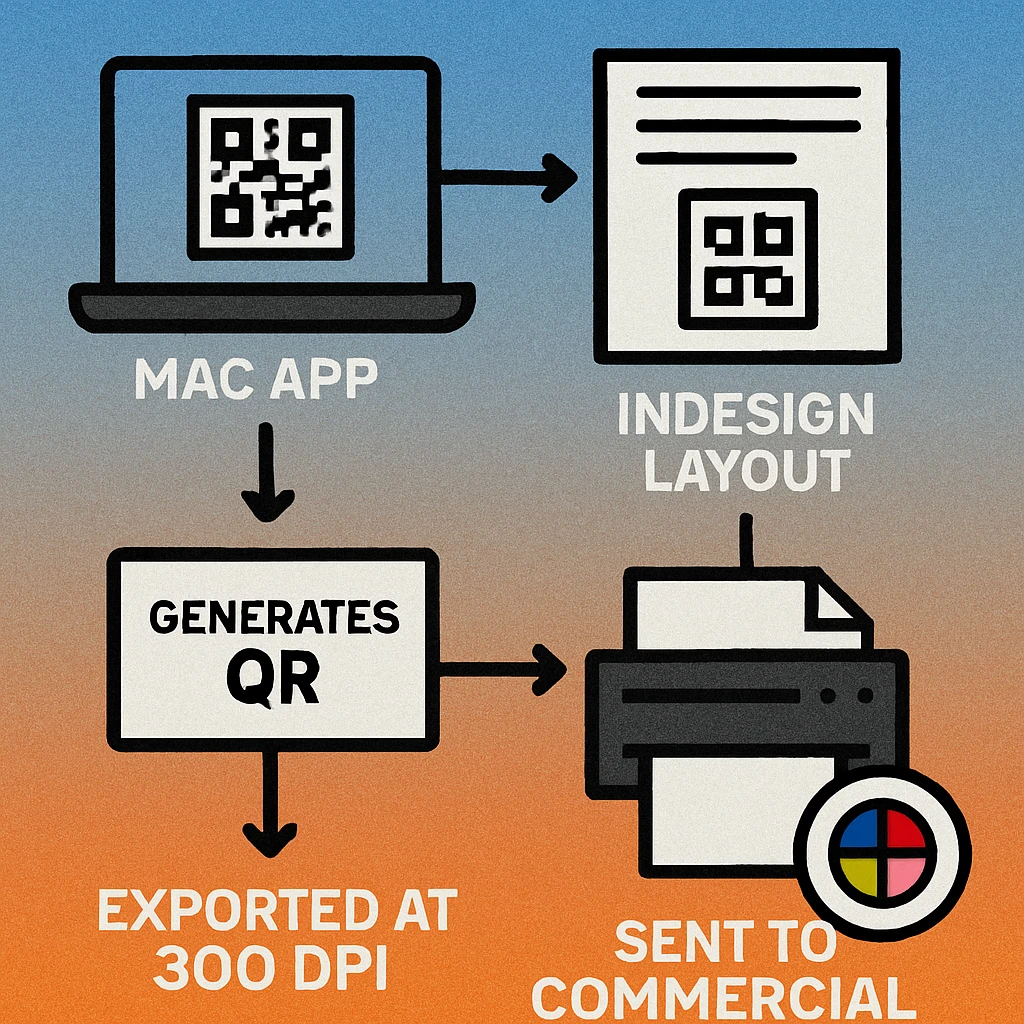
Never place a screenshot of a QR code into a print layout. Always export from a dedicated generator at the correct resolution and colour mode. The Gen QR Code Maker Mac app exports both SVG and high-resolution PNG in one click.
Resolution: 300+ DPI Explained
DPI (dots per inch) measures how many ink dots a printer places in one linear inch. The higher the DPI, the sharper each module edge appears on paper. QR codes are particularly sensitive to resolution because module boundaries — the sharp transitions between dark modules and the white background — are what scanners read. Blurry edges caused by insufficient resolution smear those transitions and cause misreads.
The standard minimum for print production is 300 DPI at the final printed size. This means: if your QR code will be printed at 5 cm × 5 cm, the exported PNG must be at least 591 px × 591 px (5 cm at 300 DPI). For large-format printing at close viewing distances, 600 DPI is a safer target. For anything larger than A4, use SVG instead — vectors are resolution-independent and infinitely scalable.
For a deeper technical breakdown, see our dedicated guide on QR code print resolution and DPI.
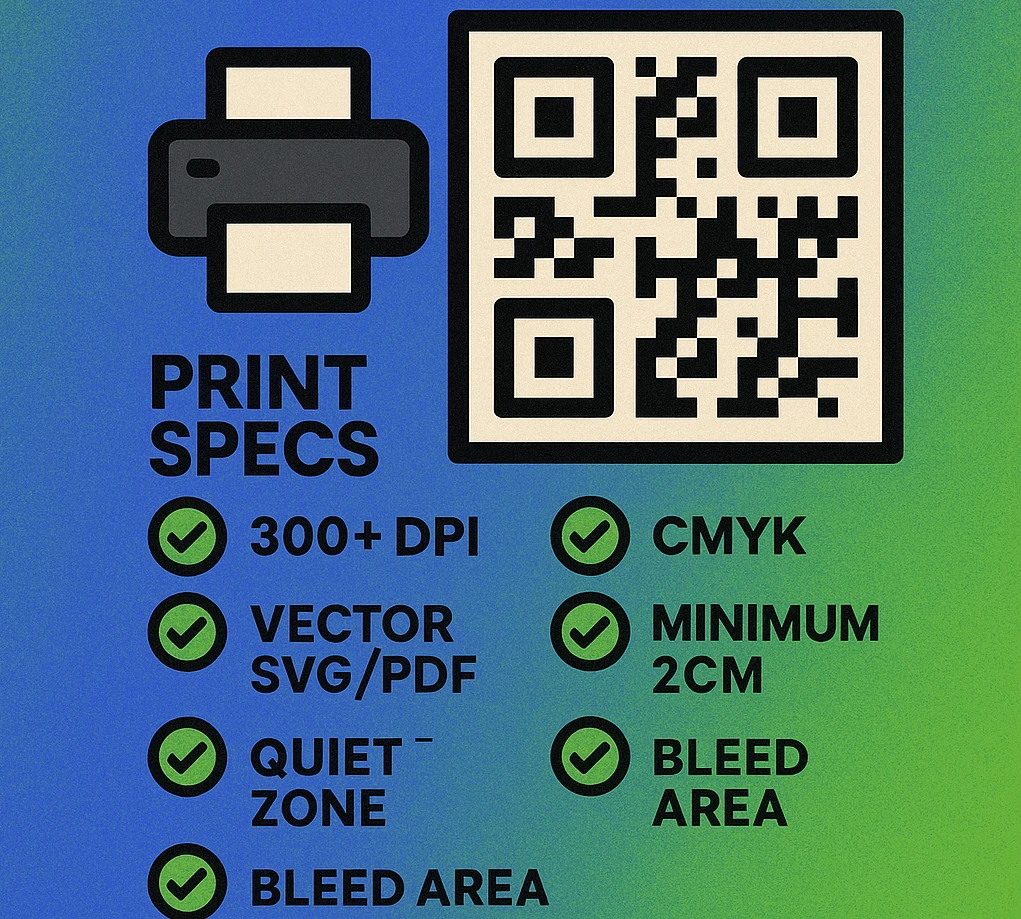
72 DPI — screen only, never for print. 150 DPI — acceptable only for large-format viewed at distance (>2 m). 300 DPI — minimum for business cards, brochures, packaging. 600 DPI — preferred for small printed sizes under 2 cm. SVG — always preferred when your print workflow supports vector.
CMYK Colour Mode
RGB is an additive colour model used by screens: it mixes red, green, and blue light. CMYK is a subtractive model used by printers: it mixes cyan, magenta, yellow, and black ink. When you export an RGB image and send it to a commercial printer, the printer's RIP (Raster Image Processor) converts the colours automatically — and that conversion can shift dark tones significantly, reducing the contrast between your QR modules and background.
The safest approach is to convert to CMYK yourself before export, so you control the result. For a solid black QR code on white, use C:0 M:0 Y:0 K:100 (rich black is not needed and can cause bleed in fine detail). For white backgrounds, use C:0 M:0 Y:0 K:0 (pure paper white). This combination gives the maximum possible contrast in CMYK and is the most reliably scanned colour pairing in commercial print.
If your brand requires a coloured QR code, always verify the CMYK values maintain a contrast ratio of at least 3:1 against the background. Pastel modules on a white background frequently fail this test when converted from RGB.
Vector Formats for Print
Vector graphics describe shapes mathematically rather than as a pixel grid, which means they scale to any size — from a postage stamp to a building wrap — without any quality loss. For print production, SVG is the preferred export format for QR codes whenever your workflow supports it.
SVG (Scalable Vector Graphics)
SVG is the native export format of the Mac QR code SVG export workflow and the most versatile option for print. You can open SVG files directly in Adobe Illustrator, Affinity Designer, and Sketch on Mac, then place them at any size in your layout. SVG files are also very small in file size, making them easy to share with print vendors.
PDF is the standard delivery format for most commercial print vendors. Place your SVG QR code into a layout document in InDesign or Illustrator, set the document colour mode to CMYK, add crop marks and bleed, then export as PDF/X-4 or PDF/X-1a. The QR code remains vector inside the PDF and will print at full crispness regardless of size.
EPS
EPS (Encapsulated PostScript) is an older vector format still required by some legacy print systems. If your vendor requests EPS, export SVG from your Mac app, open in Illustrator, and save as EPS. Avoid embedding raster images inside EPS files for QR codes — keep everything as paths.
PNG (Raster Fallback)
When vector is not supported, PNG is the only acceptable raster format for QR codes. PNG uses lossless compression, meaning module edges remain pixel-perfect. Never use JPEG for QR codes — JPEG compression introduces artifacts around high-contrast edges that directly degrade scan reliability.
Size Guide by Print Format
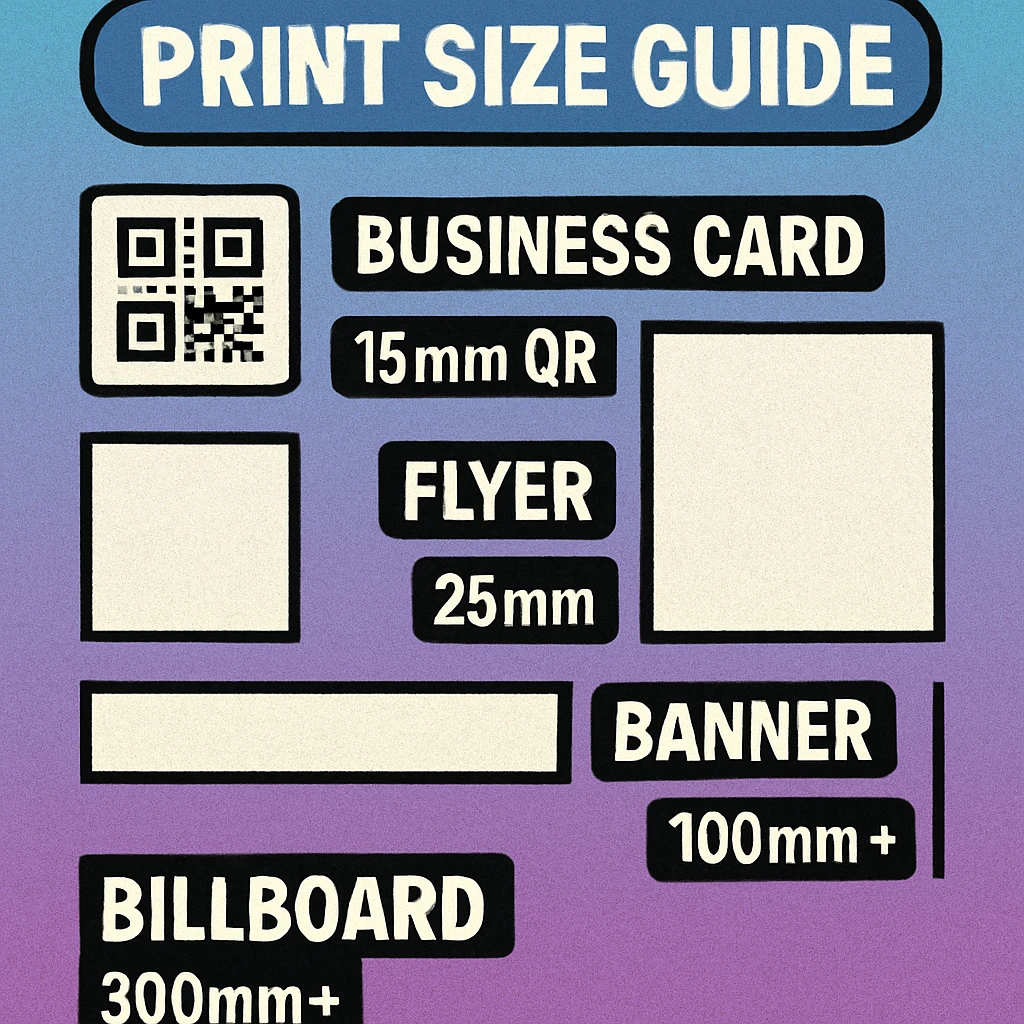
QR code size is one of the most frequently overlooked print production variables. Too small, and the camera cannot resolve the individual modules. Too large, and the code consumes premium real estate without benefit. The table below gives recommended minimum and target sizes for common print formats.
| Print Format | Min QR Size | Recommended Size | Viewing Distance | Format |
|---|---|---|---|---|
| Business Card | 1.5 × 1.5 cm | 2 × 2 cm | 25–40 cm | SVG / 600 DPI |
| Flyer / A5 | 2 × 2 cm | 3.5 × 3.5 cm | 30–60 cm | SVG / 300 DPI |
| Brochure / A4 | 2.5 × 2.5 cm | 4 × 4 cm | 40–80 cm | SVG / 300 DPI |
| Poster (A2–A1) | 4 × 4 cm | 6 × 6 cm | 0.5–1.5 m | SVG |
| Retail / POS Display | 5 × 5 cm | 8 × 8 cm | 0.5–1.5 m | SVG |
| Banner / Roll-Up | 8 × 8 cm | 12 × 12 cm | 1–3 m | SVG |
| Outdoor Signage | 15 × 15 cm | 25 × 25 cm | 2–5 m | SVG |
| Billboard | 50 × 50 cm | 80 × 80 cm | 5–15 m | SVG only |
For large-format and out-of-home advertising workflows, see our guide on QR codes for print advertising, which covers campaign-specific sizing, placement, and tracking considerations.
Quiet Zones & Bleed Areas
Two margin requirements affect every printed QR code: the quiet zone (an intrinsic part of the QR code itself) and the bleed area (a print production requirement for any element near the edge of the page).
Quiet Zone
The quiet zone is the clear border of empty space surrounding the QR code grid. The ISO 18004 standard specifies a minimum of four module widths on all four sides. Breaking into the quiet zone is the most reliable way to cause scan failures in print — it confuses the scanner's ability to locate the edge of the code. In practical terms:
- A QR code printed at 3 cm with 29 modules has modules approximately 1 mm wide. Four modules = 4 mm quiet zone minimum.
- In your layout software, add at least 4–5 mm of clear, unprinted space around the code on all sides before placing any other artwork.
- If the QR code is placed over a coloured background, the background counts as part of the quiet zone only if its contrast with the modules is maintained throughout.
Never let a bleed, fold line, perforation, or adjacent design element intrude into the quiet zone. Even a 1 mm violation can prevent scanning in poor light or at an angle. Mark quiet zone boundaries as a non-printing guide layer in your layout software.
Bleed Area
Bleed is a print production term for artwork that extends to the physical edge of the trimmed page. Commercial printers require 3 mm of bleed beyond the trim edge to allow for minor cutting inaccuracies. If a QR code is placed near the edge of a card or flyer, its quiet zone must be respected on top of the bleed requirement. In practice: keep QR codes at least 8–10 mm from any trim edge — 3 mm bleed + 5 mm quiet zone margin.
Placing QR codes near folds, perforations, or stitch lines carries the same risk. A 3–5 mm tolerance on either side of these features prevents quiet zone violations after production finishing.
Export Print-Ready QR Codes on Mac
SVG, high-resolution PNG, CMYK-ready — the Gen QR Code Maker Mac app handles every step of the print production workflow natively on macOS.
Mac Export Workflow: Step by Step
The following workflow uses the Gen QR Code Maker Mac app as the starting point. It produces a press-ready PDF suitable for commercial offset printing.
Print Production Workflow on Mac
Generate at maximum quality. Open the Mac QR code generator, enter your URL or content, set error correction to H (30%), and apply your design. Error correction H gives the most redundancy against print imperfections such as slight ink spread or substrate texture.
Export as SVG. In the export panel, choose SVG format. SVG is resolution-independent, so the same file works for a business card and a banner. If your workflow requires PNG, set resolution to at least 300 DPI at the final printed size — or 600 DPI for anything smaller than 3 cm. See our full Mac SVG export guide for format-specific options.
Place into your layout application. Open InDesign, Illustrator, or Affinity Publisher on Mac. Set the document colour mode to CMYK. Place the SVG file and size it to your target dimensions, ensuring the quiet zone margin is preserved on all sides.
Verify CMYK values. Select the QR code object and confirm module colour is C:0 M:0 Y:0 K:100 and background is C:0 M:0 Y:0 K:0. If using brand colours, use the Colour Picker to check values and verify contrast ratio with an accessibility tool before proceeding.
Add crop marks and bleed. In the export dialog, enable crop marks and set bleed to 3 mm on all sides. Confirm the QR code quiet zone is not closer than 5 mm to the trim line on any side.
Export as PDF/X-4. PDF/X-4 is the current ISO standard for print-ready PDF files and is accepted by virtually all commercial printers. It embeds fonts, preserves CMYK colour values, and supports transparency correctly. Deliver this file to your print vendor.
Request a proof and scan-test it. Before approving a full production run, request a physical proof from your printer. Scan the proof with an iPhone Camera app and an Android device. If it scans cleanly on both, approve the run. If not, check quiet zone, contrast, and module size before proceeding.
Frequently Asked Questions
Use a minimum of 300 DPI for standard print materials such as business cards, flyers, and brochures. For large-format printing — posters, banners, and signage viewed at close range — target 600 DPI or export as SVG. Raster images scaled up from a low resolution will produce blurry module edges that scanners may struggle to read.
Always convert to CMYK before sending artwork to a commercial printer. RGB colours look vivid on screen but can shift when converted to CMYK ink during printing, particularly dark tones, which may reduce the contrast ratio needed for reliable scanning. Export your QR code from your Mac app in CMYK mode, or place an SVG into InDesign or Illustrator and convert the document colour space to CMYK before the final export.
The quiet zone is the blank margin surrounding the QR code grid. The ISO standard requires a minimum of four module widths on all sides. In practical terms, for a 3 cm QR code with 29 modules, four module widths is roughly 4 mm. Never crop into the quiet zone — this is the single most common cause of scan failure in printed materials. In your layout software, add at least 4 mm of clear space between the QR code and any surrounding artwork.
SVG (Scalable Vector Graphics) is the ideal format for print because it scales to any size without quality loss. If your print workflow requires a raster format, use PNG at 300 DPI or higher — never JPEG, which introduces compression artifacts that soften module edges. The Gen QR Code Maker Mac app exports both SVG and high-resolution PNG directly from the desktop.